- Intro
- Getting the Most Out of RetoArch
- Resolution Comparison
- Starting Games That Won’t Load
- Getting the Most Out of PCSX Standalone
- Verifying the Overclock
- Conclusion
Intro
You can turn on enhanced resolution for the PCSX ReARMed RetroArch core on the Miyoo Mini/Plus to make PS1 games look more sharp. 2D games won’t be noticeably different but the 3D games will look much cleaner.
The RetroArch core will need overclocking to run games smoothly using enhanced resolution. The standalone PCSX ReARMed app will run even better than the RetroArch core but both are good options to improve the graphics of your 3D PS1 games.
This guide is using Onion OS. If you don’t have it installed, you can refer to the Onion OS installation section in this guide: https://duckyobrien.com/2024/02/15/playing-nintendo-ds-games-on-the-miyoo-mini-plus/
Getting the Most Out of RetoArch
Turning on Enhanced Resolution (PCSX ReARMed – RetroArch)
While in a PS1 game using PCSX ReARMed, press Menu + Select to bring up the RetroArch menu.
Go to Core Options -> GPU Plugin.
Enable Enhanced Resolution (Slow) – which will increase the resolution.
Enable Enhanced Resolution Speed Hack – which will let the game run faster at those enhanced resolutions.
Sometimes the speed hack will make games run worse so this is one of the things you’ll have to fine tune on a per game basis.
As a side note, if some games are bugging out, you can try going to Speed Hacks (Advanced) and enable Disable SMC Checks. Only a few games should require this.
Overclocking (PCSX ReARMed – RetroArch)
Many games will run poorly with enhanced resolution but overclocking the handheld will make them run much smoother. To overclock:
Create a text file named cpuclock.txt in SD:\Saves\CurrentProfile\config\PCSX-ReARMed.
Open cpuclock.txt and type in one line with the four digit number:
1600 – for the OG Miyoo Mini.1800 – for the Miyoo Mini Plus.
Save and exit.
You can overclock higher if you want to but in my personal experience going over these numbers resulted in the apps crashing.
Also, overclocking does not drain the battery faster or generate more heat on the Miyoo Mini/Plus.
Resolution Comparison
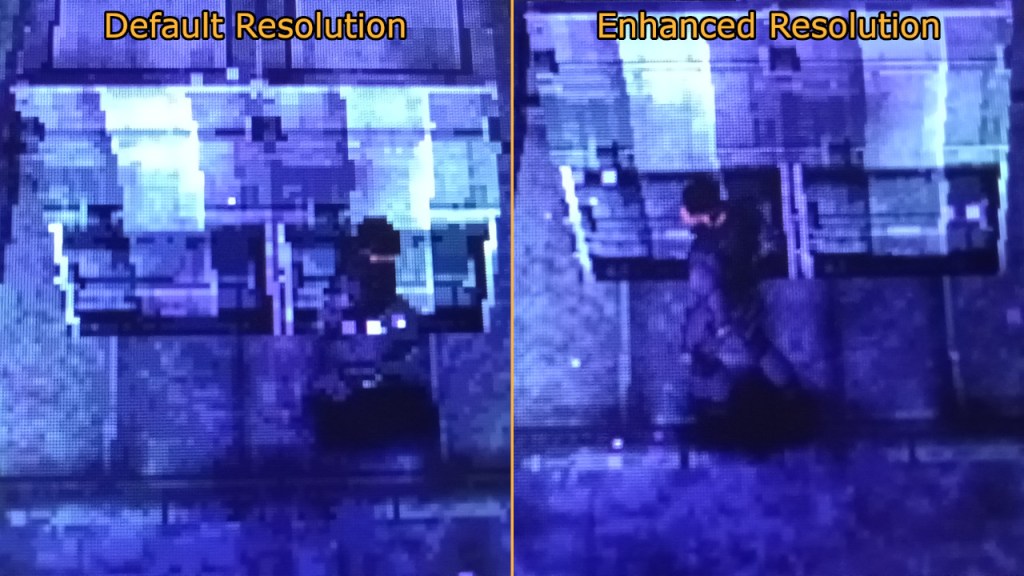
As you can see, the enhanced resolution’s image is definitely sharper. You can visibly tell the resolution is much higher and the image looks less pixelated. Using enhanced resolution may be worth it for people who want a sharper image.

It depends on the game but 2D games don’t really benefit too much from enhanced resolution.
Starting Games That Won’t Load
As a side note, the standalone app didn’t load MGS1 using the m3u file for some reason so I had to load the individual chd files. To do this, press Menu, go to Load CD image and press Start. Navigate to SD:\Roms\PS_hidden\multi-disc and pick the proper disc image.
While the difference for 3D games isn’t that drastic, the games do look sharper and run at a higher frame rate.
Getting the Most Out of PCSX Standalone
Installing PCSX Standalone
Once you’re in your handheld, go to Apps -> Package Manager.
Press R once to go to the Apps tab, and make sure Expert (Shortcut) is enabled. The Expert shortcut is used to access the PCSX Standalone app.
Press R once again to go to the Expert tab, and press up once to scroll to the bottom.
Make sure Sony-PlayStation (PCSX standalone) is enabled.
Press Start twice to install and exit.
Now the standalone app is installed and you can access it from the Expert shortcut in the Apps folder. Now let’s say you don’t want to go into Apps -> Expert -> PCSX Standalone every time you want to start a PS1 game since it’s a bunch of extra button presses. We can move the standalone app to where our other emulators are in the next step.
Moving The App
All we have to do is copy SD:\RApp\PCSX-ReARMed to SD:\Emu\PCSX-ReARMed.
That’s right, we’re just copying the entire PCSX-ReARMed directory from RApp, which is where the expert apps are installed, to the emu directory where our other emulators are.
Now when you start your Miyoo Mini, you’ll see the PCSX standalone app listed amongst your regular emulators. I didn’t do thorough testing but it seemed like I didn’t need to change any of the config files and everything seemed to work fine. It is entirely possible that doing this will break something later so just giving you guys a heads up.
Overclocking (PCSX ReARMed – Standalone)
Backup launch.sh in SD:\Emu\PCSX-ReARMed. You can just copy and paste the file and rename it to launch - original.sh.
Open launch.sh with an editor like notepad and right above the ./cpufreq.sh call, add a line that says:
cpuclock 1600 – for the OG Miyoo Minicpuclock 1800 – for the Miyoo Mini Plus
Code snippet shown below:
"${progdir}/bios/scph1001.bin"
	fi
fi

#overclocking addition
cpuclock 1800

./cpufreq.sh
export LD_LIBRARY_PATH="$progdir/lib:$LD_LIBRARY_PATH"
Save and exit.
Overclocking is necessary for some games such as Metal Gear Solid 1. Running the games with enhanced resolution will cause some slowdowns in some areas without the overclock. You will be able to tell by the frame rate dropping as well as with the audio becoming unstable.
Verifying the Overclock
The easiest way to verify is to turn on a FPS counter and play the game. You will see visible dips in the frame rate or noise in the audio before overclocking and they should disappear for the most part after overclocking.
FPS Counter (PCSX ReARMed – RetroArch)
While in game, press Menu + Select to bring up the RetroArch menu.
Go to Video.
Enable Display Internal FPS.
FPS Counter (PCSX ReARMed – Standalone)
While in game, press Menu to bring up the PCSX Standalone menu.
Go to Options and press the Start button (Start confirms, Menu backs out in the standalone menu).
Toggle Show FPS to ON.
If you want to show FPS on all games, go down to Save global config and press Start, and then press Menu to back out to the game.
Telnet
You can also telnet into your handheld and run the cpuclock app to check the clock speed.
To enable telnet on Windows 10, type in telnet into the Windows search bar and press enter.
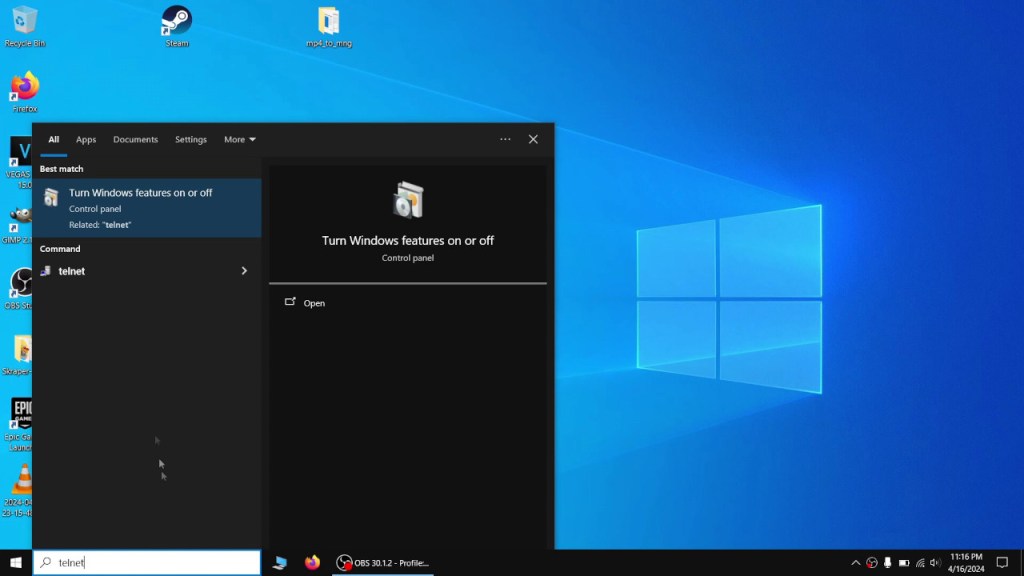

This will bring up the Turn Windows features on or off box. Scroll down and check the box next to Telnet Client and press OK to confirm the changes. The process may be slightly different for other versions of Windows.
On the Miyoo Mini Plus, make sure WiFi is turned on and you are connected to your home network.
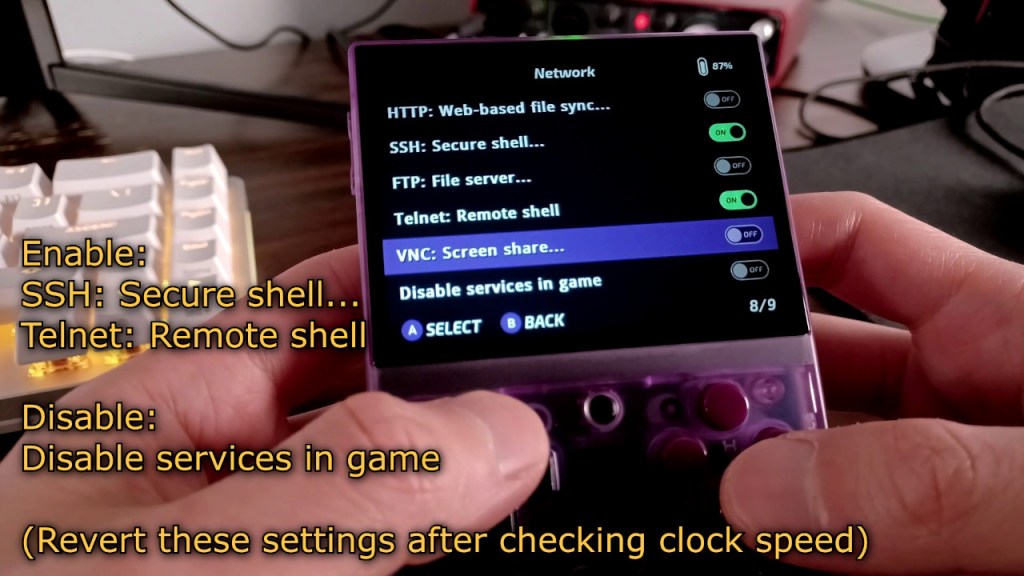
Go Apps -> Tweaks -> Network.
Enable SSH :Secure shell... and Telnet: Remote shell.
Disable Disable services in game.
Scroll back to the top and write down your IP address. Mine was 192.168.0.101.

Make sure to disable SSH and Telnet and then re-enable Disable services in game after you check the clock speed. Telnet is not secure.
Going back to your PC, start the command prompt by typing in cmd in the search bar or you can press the Windows Key and R to bring up the run box and type in cmd there.
In the command prompt type in telnet and a space followed by your Miyoo’s IP address. For example telnet 192.168.0.101. Mine was 192.168.0.101 but yours may differ.
Once telnet connects, you can access your Miyoo Mini using console commands. This is very insecure so make sure to disable telnet and turn disable services in game back on after you are finished checking the clock speed.
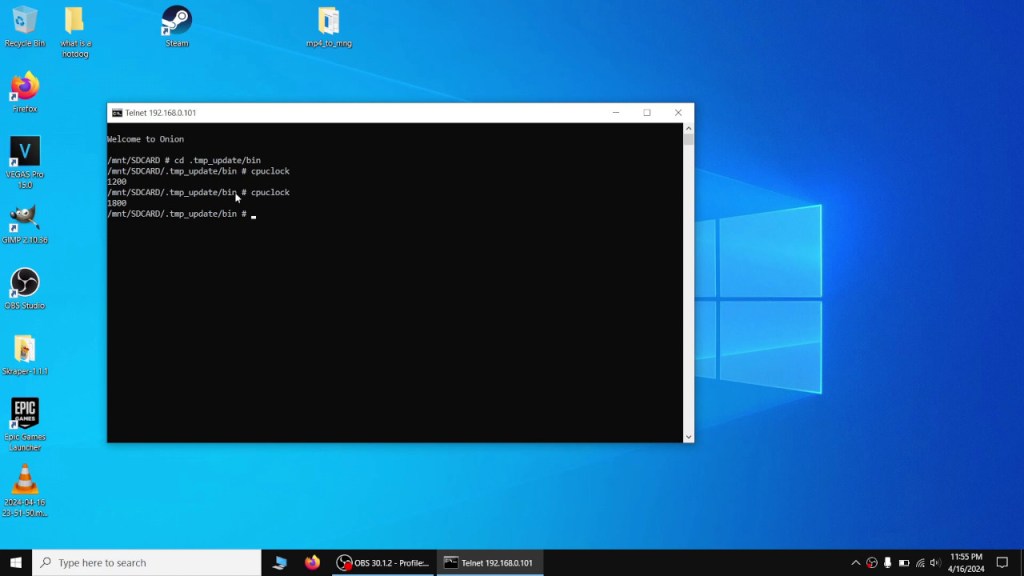
Type in cd .tmp_update/bin and press enter to change to the directory where the cpuclock app is located.
Type in cpuclock and press enter to display your clock speed. As you can see on the default standalone app the clock speed was set to 1200 but after making the launch.sh edit it is now 1800.
You don’t have to do this step, this is just to double check if the overclock worked. You can mostly tell just by playing the game because it will run smoother in parts that had issues.
Conclusion
Using enhanced resolution definitely makes a difference for 3D games. It’s not what I would call a drastic difference but it is noticeable enough. While the standalone PCSX ReARMed app performs much better, you also lose the features of the RetroArch core and integration into Onion OS. You’re trading a higher resolution and frame rate for less convenience.
For those wanting to squeeze as much performance out of their handhelds as possible, I would recommend overclocking and using the standalone app with enhanced resolution.
For those wanting better graphics as well as the quality of life additions that RetroArch brings, I would recommend overclocking and using the RetroArch core with enhanced resolution.
For those who don’t notice a difference or don’t care, I’d just use the RetroArch core with no changes.
The end goal is to play games and whatever settings makes you enjoy the games more are the important ones to you.
Anyways I hope this guide was helpful. If you have any questions or comments, please feel free to leave one down below. As always, hope you guys are staying safe and sane out there, and catch you guys next time.

Thanks for this guide, super helpful!
Do you know if there’s a way of sharing memory cards between the RetroArch core and the standalone emulator? I got part way through a few games using RetroArch, and my saves don’t seem to be available via the standalone app 🥲. Makes switching over to it a bit inconvenient.
LikeLiked by 1 person
Yo thank you for leaving a comment!
I don’t know off the top of my head but my initial googling shows you can use a third party app to share a memory card or it may be possible for PCSX ReARMed to be tweaked. I’ll do more research and reply back if there is a solution! If this solution requires an app I’ll try building it for Onion OS. This should take me a few days to work out.
LikeLiked by 1 person
Just letting you know that I haven’t found a clean solution yet.
Looks like the standalone app saves memory cards in its own folder (i.e. SD:\RApp\PCSX-ReARMed\.pcsx\memcards) and they’re named “card1.mcd” to “card9.mcd”.
The RetroArch core saves a memory card for each game as a “.srm” file and the saves are located in SD:\Saves\CurrentProfile\saves\PCSX-ReARMed. There is an option to turn on a shared memory card in slot 2 and that is simply named “pcsx-card2.mcd”.
I did read that you can just rename mcd to srm and vice versa.
Anyways, I was initially thinking of using an app like syncthing to sync both save directories but since the naming convention is not the same, this will bring up some issues if I were to write a script myself. I’m still a novice at coding.
You can copy over RetroArch save files to the standalone app but I’m not sure if that’s good enough for you.
I’ll keep looking for a solution!
LikeLike
Oh cool, yeah copying the save files over to the standalone app is good enough for me. I’ll give that a try, thanks! 🙂
LikeLiked by 1 person
OK np! Hope it works out! Let me know if you need any more help. I would back up your save files just in case lol.
LikeLiked by 1 person
Thank you so much for the article! The PS1 games I wanted to play (3D) on MM+ are so much more fun when the performance is decent 🙂
LikeLiked by 1 person
Thanks for leaving a comment! PS1 games definitely do feel better when they look a bit sharper haha.
LikeLike