- Intro
- Checking RetroArch
- Credit to wesley10pro & cbepx-me
- Prerequisites
- A Word of Warning
- Phone Instructions
- Handheld Instructions
Intro
This is a guide on how to update the stock OS for the RG35XX series of handhelds to the latest version of stockmod using only an Android phone. This method should work for the RG35XX 2024 version, Plus, H, SP, and the 28XX.
You can of course use this method with a PC as well.
The best thing about this method is that it does not require you to flash an image meaning you won’t lose any ROMs, saves, or save states!
Checking RetroArch
Some versions of stock OS already have RetroArch 1.18. This will let you trade Pokemon wirelessly for GBA games so if that was your only goal, you don’t need to upgrade to stockmod if you already have RetroArch 1.18.
You can check by going to Settings -> Retroarch Settings -> Start Retroarch and the version number will be in the lower left hand corner.

Credit to wesley10pro & cbepx-me
Huge thanks to wesley10pro & cbepx-me. wesley10pro wrote the original guide on how to upgrade using only your phone.
This is the reddit post: https://www.reddit.com/r/RG35XX/comments/1d7uk07/this_is_how_i_update_my_ambernic_without_a_pc/
I used this guide as a base for my guide. If you found this guide to be helpful, drop by the reddit thread and thank the OP!
cbepx-me authored the stockmod and created a very handy way to update without having to lose any files.
Prerequisites
We’ll need a few things before we start the update.
Phone with microSD Card Slot
Your phone needs to have a microSD card slot. They are usually located next to your sim card.


Phone with OTG
If your phone doesn’t have a microSD card slot, then you need OTG support. Look up your phone model to see if it has OTG. If it does, we can use a microSD to USB C adapter to connect the microSD card to your phone.
Handheld Firmware Dated 20231212 or Later
This upgrade process only works on stock operating systems dated 20231212 or later. Only the earliest versions of the RG35XX Plus and possibly the H should have a firmware version this early.
You can check by going into Settings -> Firmware version. If your firmware is dated before 20231212, then you cannot use this procedure.

Battery Life
This upgrade process does take some time so make sure your console has enough battery life before proceeding. If it turns off in the middle of the upgrade process, you may corrupt your microSD card and your handheld may not be able to boot.
A Word of Warning
Before your start, I do have to warn you about some risks involved with this process. The stock microSD cards are notorious for high fail rates. This upgrade process may end up corrupting some data. This means your handheld will be useless without the microSD card. You’ll need a PC to try to recover the corrupted data or reflash a new image, losing all your ROMS, saves, and save states in the process.
If you don’t want to take the risk, then do not do this process. If you are willing to take the risk, then go right ahead.
Phone Instructions
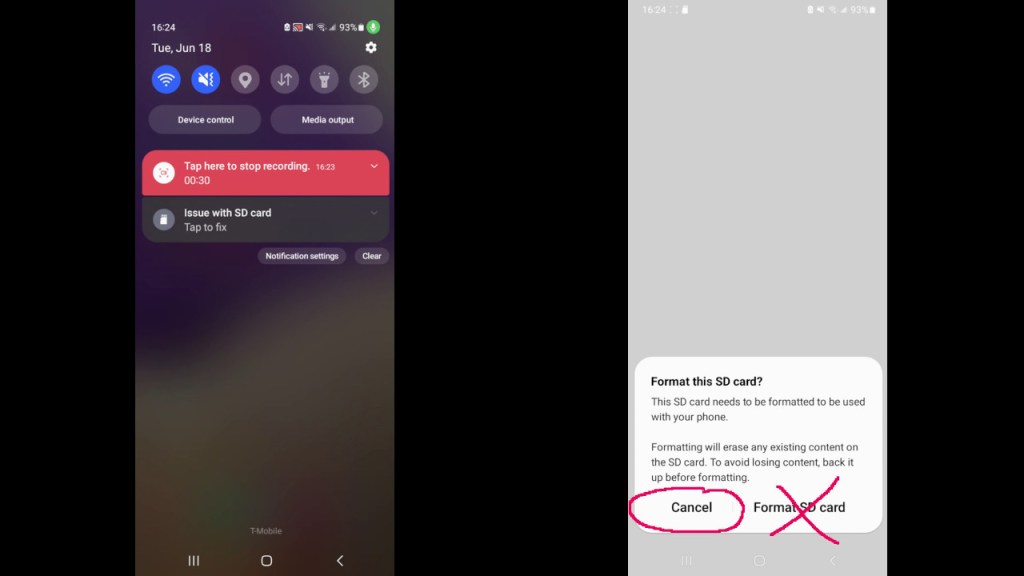
microSD Notification
After inserting your microSD card into the phone, you may get a notification about your microSD card. If you click on it, it will give you a prompt to format the card.
DO NOT FORMAT.
Formatting will erase everything.
You can safely ignore this notification.
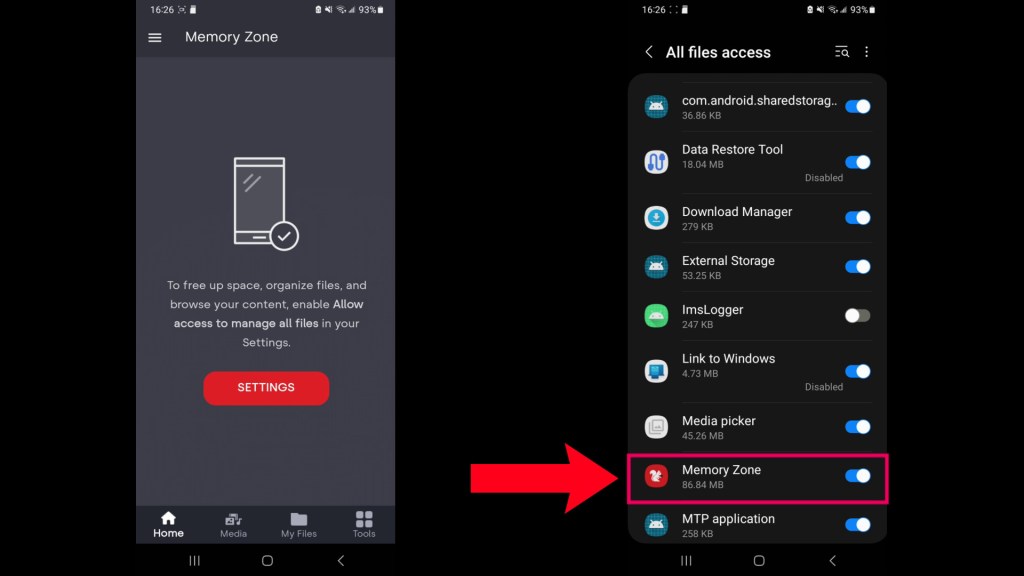
Installing SanDisk Memory Zone
The next step will be to install the SanDisk Memory Zone app. This app will let us access the ROMs partition of the microSD card. By default Android will usually mount the first available partition and it will be a 128MB partition, which is not the one we want to use.

Accept the EULA, opt out of data collection, and skip the initialization process. Click on the settings button and give SanDisk Memory Zone permission to access all files.
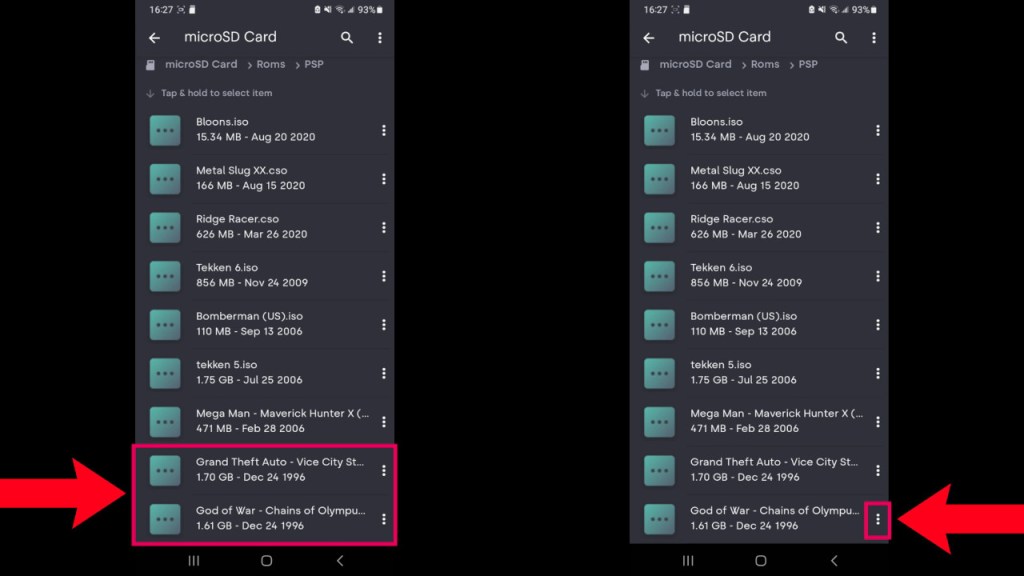
Making Space for Upgrade Files
After installing, go to My Files -> microSD Card -> Roms -> PSP. We’ll be deleting the two largest PSP games in order to make space so we can copy over the upgrade files as well as provide enough space for the system to make use of.
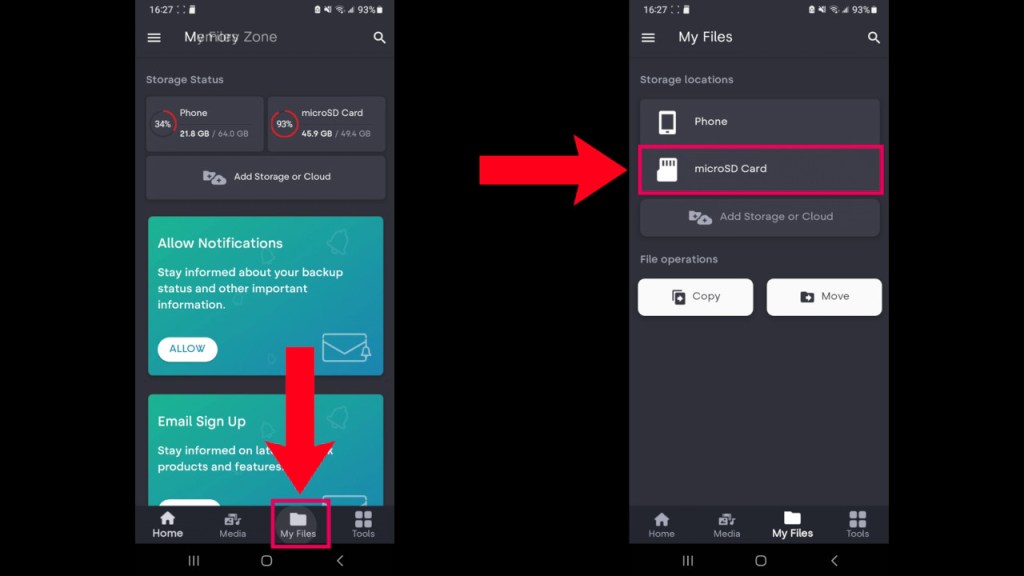
We’ll be deleting God of War: Chains of Olympus and GTA: Vice City Stories. If you wanted to play these games, you can redownload them later or copy them to your phone’s internal storage.
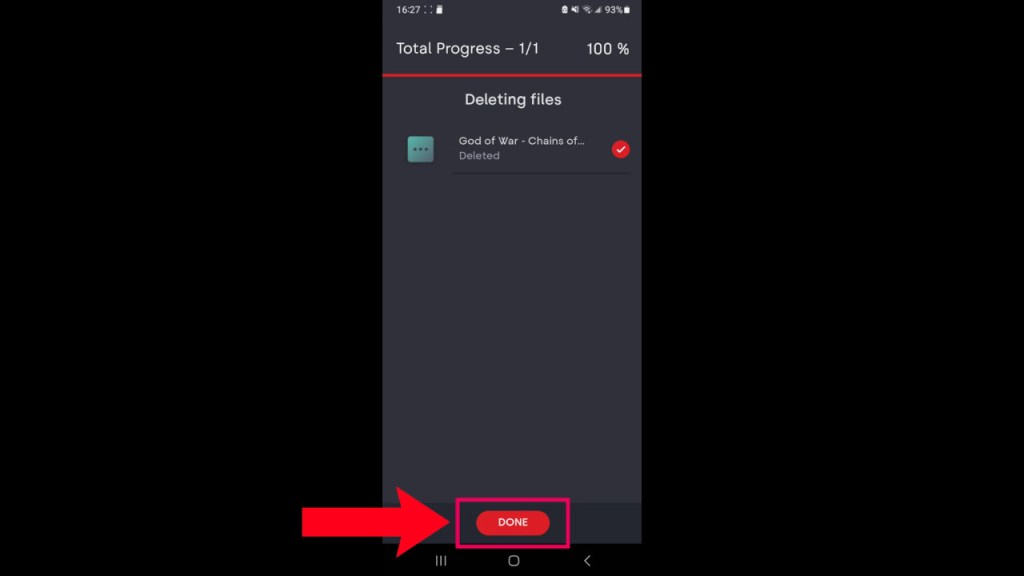
Wait for the app to show you the “Done” button. Once the deletion process is finished, the button will show.
Downloading and Extracting Stockmod
Go start a browser (I like using firefox) and google “rg35xxh stockmod”. The second result should be the github page for cbepx-me.
Direct link: https://github.com/cbepx-me/RG35xx-P-RG35xx-H-Modification/releases
I like switching to desktop mode for the browser as the mobile site does not show all the links I need.
Go click on releases on the right hand side and then scroll down to the download section and click on the google drive link.
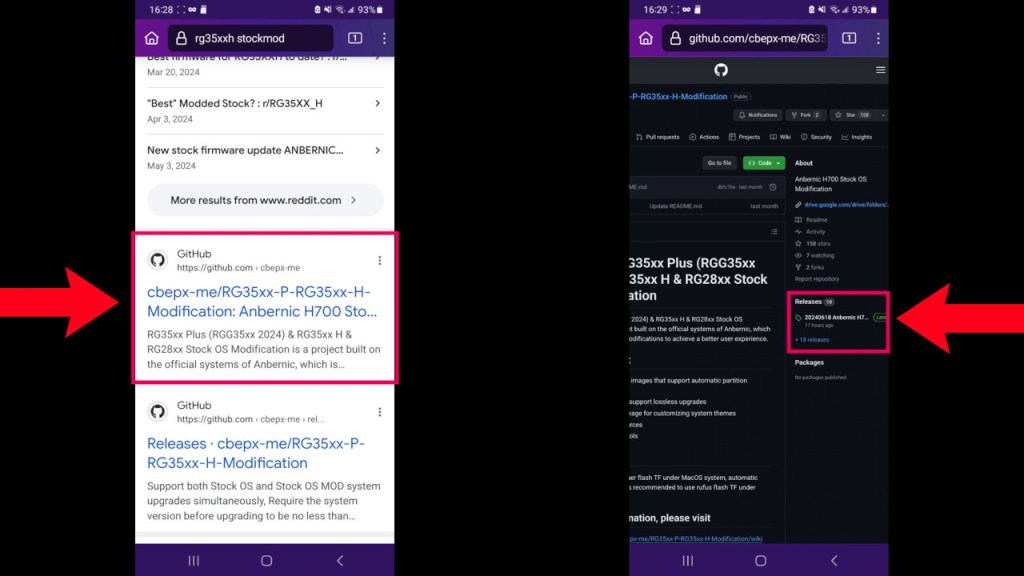
It will show a list of systems. Click on the link for the system you have. I have a RG35XXH so I clicked on the “RG35XX_H”.
Click on “Stock_OS_MOD”.
Click on “Update_Package”.
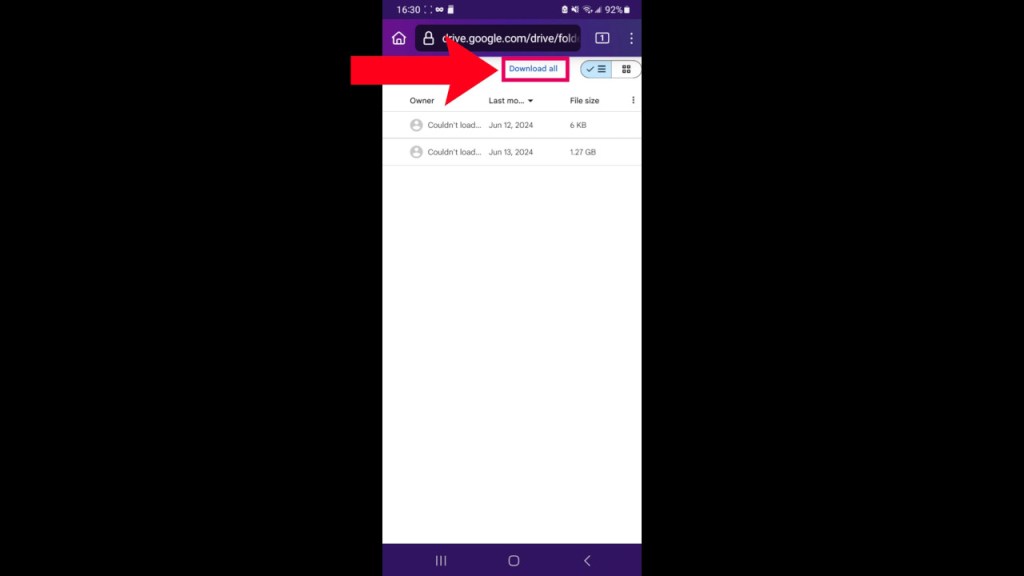
Now most likely the google drive limit will have been reached so you won’t be able to download the file. You can click on the “Download all” link on the top right hand side and it will zip the files and will let you download the files.
After the file has downloaded, you can click on it to extract the contents. After extracting, go inside the folder and extract the file ending with .7z.
We’re finished with the stockmod prep and we’ll be switching to the SanDisk Memory Zone app to copy the files.
Copying Stockmod to the microSD
Once in the app, go to My Files -> Phone -> Download -> Update_Package-20240618T213... -> Update_Package -> RG35xxH_Upgrade_20240428-v... and then click on the 3 dots on the Roms folder and select Copy to. Pick the microSD Card as the destination and click on the COPY ITEMS HERE button.
Let the copy finish, it should take a minute or two.
We’re done prepping the microSD card. You can safely eject it from your phone and insert it back into the handheld.
Handheld Instructions
Make sure to insert the microSD card back into TF1 and not TF2. TF1 is the slot on the left hand side. The contacts of the microSD card should be facing up with the print side facing down.
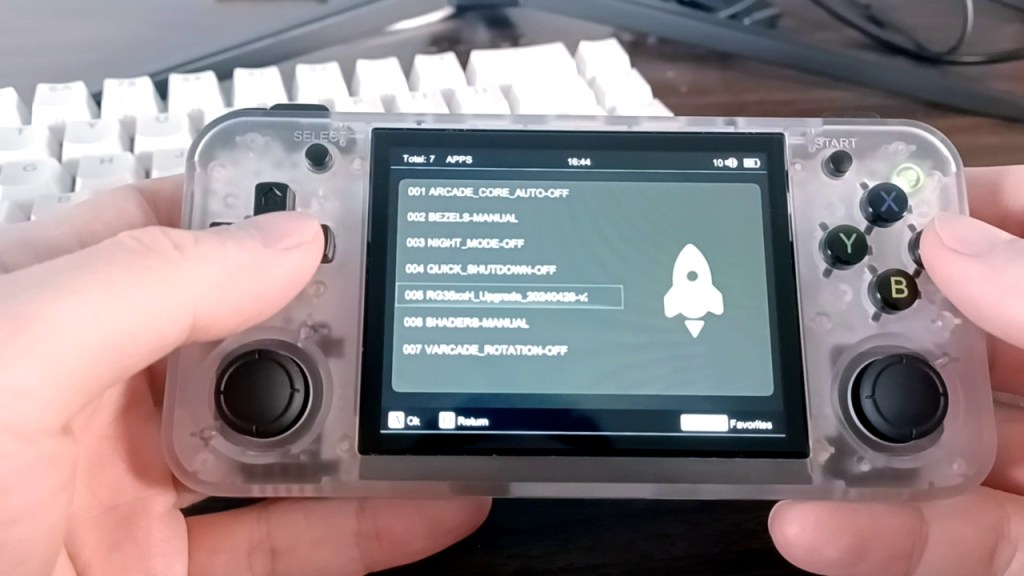
Go to RA Game -> APPS -> RG35xxH_Upgrade_202404280v and start the upgrade app.
I’ll outline the process below with rough time estimates:
Loading Upgrade App – ~1 minute
Click Yes
Updating Files – ~4 minutes 30 seconds
Restart by Pressing any Button at prompt
Finishing Install – ~3 minutes
Initialize System Settings
After it’s done updating, you can verify the update took place by going to Settings -> Retroarch Settings -> Start Retroarch and check the version. It should be 1.18 now.
Tweaks for GBA Wireless Trading
The first thing we’ll need to do is change the core to use gpSP. Go to RA Games -> GBA and scroll down to Pokemon FireRed, LeafGreen or Emerald and press Y to bring up core selection. Pick gpsp_libretro.so and press B to back out. If you are unable to back out, press and hold the power button to shut down and restart the handheld. This happened to me the first time I tried this for some reason.
Start the game and press the menu button on top of the handheld to bring up the RetroArch menu. Go to Core Options -> Link Cable Connectivity and set it to GBA Wireless Adapter.
Press B twice to back out to the main level of RetroArch and go to Netplay. Have one person Host and the other Connect to Netplay Host. You’ll need the IP address of the host.
If you don’t know what that is, you can go to Main Menu -> Information -> Network Information.
Ok that’s it! If you guys have any questions please feel free to leave a comment down below. It is possible to flash any image or format any microSD card but most of the solutions I’ve read about required you to root your phone. I imagine most people may not be comfortable rooting their device or may not be able to so I’ll keep looking for a solution for other cfw for other handhelds.
Thanks for reading my guide, hope it helped, and hope you guy stay safe and sane out there.
